|
The pictorials are illustrated with spaces between beads for a clearer direction, in the actual beading, there should be no spaces.
|
Beaded Chicken :
What you need:
1) Glass seed beads, size 11/0 black, white, yellow and red color.
2) Beading string (0.25mm)
Always Remember to pull tight on EVERY STEP.
|

|
|
| Step 1: |
Cut a piece string around half a meter long.
- Add five white beads on the exact center of the string, add crisscross the other end through the last added bead.
Make sure this 5 bead ring is centralized at the center of the string.
|
|
 |
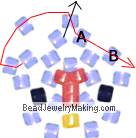
| Step 2: |
- Continue to:
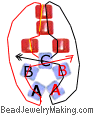
Add one red bead on each side of the string, add another two red bead on both of the string together. (this is the comb on top of the chicken's head)
Continue to pass the left (red) string through three old beads from step 1 (marked A, B and C).
Continue to pass the right (black) string through three old beads from step 1 (marked A, B
and C).
- Note the strings should exit the same bead where the strings exited from step 1.
|
|
|
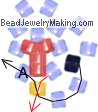
| Step 3: |
- Continue to:
Add four white beads on the left (black) string, crisscross the right (red) string through the last bead added.
Continue to pass the black string (the one you just used to add new beads on) through one old bead from step 1 (marked A).
|
|
 |
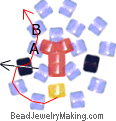
| Step 4: |
- Continue to:
Add two white and one black beads on the top (red) string, crisscross the bottom (black) string through the last bead added.
Continue to pass the red string (the one you just used to add new beads on) through one old bead from step 1 (marked A).
|
|
 |
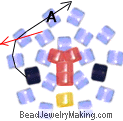
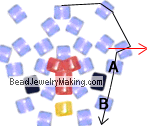
| Step 5: |
- Continue to:
Add two white and one yellow beads on the right (black) string, crisscross the left (red) string through the last bead added. (note: you can use a larger or oval yellow bead if you want a bigger or more protruding beak for the chicken)
Continue to pass the black string (the one you just used to add new beads on) through one old bead from step 1 (marked A).
|
|
 |
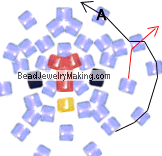
| Step 6: |
- Continue to:
Add two white and one black beads on the bottom (red) string, crisscross the top (black) string through the last bead added.
Continue to pass the red string (the one you just used to add new beads on) through two old beads from step 1 and step 2 (marked A and B).
|
|
 |
| Step 7: |
- Continue to:
Add two white beads on the bottom (black) string, crisscross the top (red) string through the last bead added.
Continue to pass the black string (the one you just used to add new beads on) through one old bead from step 2 (marked A).
|
|
 |
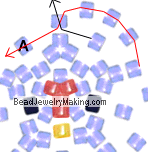
| Step 8: |
- Continue to:
Add three white beads on the bottom left (red) string, crisscross the top right (black) string through the last bead added.
Continue to pass the red string (the one you just used to add new beads on) through two old beads from step 2 and step 3 (marked A and B).
|
|
 |
| Step 9: |
- Continue to:
Add two white beads on the top left (black) string, crisscross the bottom right (red) string through the last bead added.
Continue to pass the black string (the one you just used to add new beads on) through two old beads from step 3 and step 4 (marked A and B).
|
|
 |
| Step 10: |
- Continue to:
Add two white beads on the top (red) string, crisscross the bottom (black) string through the last bead added.
Continue to pass the red string (the one you just used to add new beads on) through two old beads from step 4 and step 5 (marked A and B).
|
|
 |
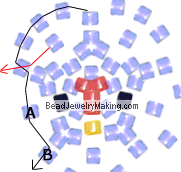
| Step 11: |
- Continue to:
Add two white beads on the right (black) string, crisscross the left (red) string through the last bead added.
Continue to pass the black string (the one you just used to add new beads on) through three old beads from step 5, 6 and 7 (marked A, B and
C).
|
|
 |
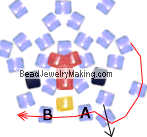
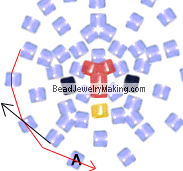
| Step 12: |
- Continue to:
Add one white bead on the bottom (red) string, crisscross the top (black) string through the bead added.
Continue to pass the red string (the one you just used to add new beads on) through four old beads from step 8, 9, 10 and 11 (marked A,
B, C and D).
Also pass the other (Black) string through the bead marked D.
- Now you have the head of the chicken finished!
|
|
 |
| Step 13: |
- Continue to:
Add four white beads on the left (red) string, crisscross the right (black) string through the last bead added.
Continue to pass the red string (the one you just used to add new beads on) through one old bead from step 10 (marked A).
|
|
 |
| Step 14: |
- Continue to:
Add three white beads on the bottom (black) string, crisscross the top (red) string through the last bead added.
Continue to pass the black string (the one you just used to add new beads on) through one old bead from step 9 (marked A).
- Note: the two beads where each arrow exits from in this step is where the right chicken wing will go on later.
|
|
 |
| Step 15: |
- Continue to:
Add four white beads on the bottom right (red) string, crisscross the top left (black) string through the last bead added.
Continue to pass the red string (the one you just used to add new beads on) through one old bead from step 8 (marked A).
|
|
 |
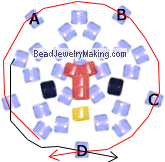
| Step 16: |
- Continue to:
Add four white beads on the top (black) string, crisscross the bottom (red) string through the last bead added.
Continue to pass the black string (the one you just used to add new beads on) through two old beads from step 12 and step 13 (marked A
and B).
- Note: The bead marked A from step 15 and the bead used for crisscrossing in this step will be where the left chicken wing will go on later.
|
|
 |
| Step 17: |
- Continue to:
Add two white beads on the top (red) string, crisscross the bottom (black) string through the last bead added.
Continue to pass the red string (the one you just used to add new beads on) through one old bead from step 13 (marked A).
|
|
 |
|
Continue the tutorial on page 2 of the beaded 3D Chicken project!
|