|
|
 |
|
| Step 18: |
Continue to: (working only on one string at this step)
- Add one size 12/0 bead on the bottom (red) string and continue to pass the same string through one old bead marked A.
|
|
 |
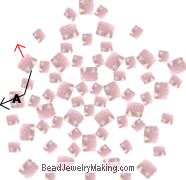
| Step 19: |
Continue to:
- Add one size 12/0 bead on each side of the string (total of 2 - one on each string) add one size 11/0 bead to crisscross both strings through.
|
|
 |
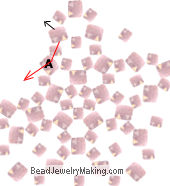
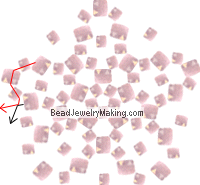
| Step 20: |
Continue to:
(working only on one string at this step)
- Add one size 12/0 bead on the bottom (black) string and continue to pass the same string through one old bead marked A.
|
|
 |
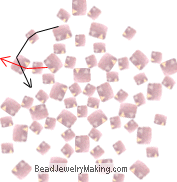
| Step 21: |
Continue to:
- Add one size 12/0, one size 11/0 and one size 12/0 beads on the top (red) string.
Tie off and pass the excess string back through the finished piece (no specific order, just to strengthen the knot).
|
|
 |
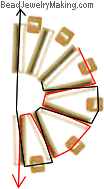
| Step 22: |
Making the Cupcake Cup:
- Cut a piece of beading string, around 10 inches long.
- Add on the string one long bugle, one size 11/0 seed bead (color of choice for the cup) and one last long bugle to crisscross both lines through.
|
|
 |
| Step 23: |
Continue to:
- Add one size 12/0 bead on the top (black) string.
Add one last long bugle to crisscross both lines through.
- Keep repeating this step four more times.
|
|
 |
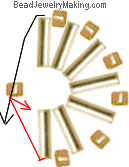
| Step 24: |
After repeating step 23 four more times, continue to:
- Pass the top (black) string up through one old long bugle bead that was first added in step 22 (shown where the black arrow exits).
|
|
 |
| Step 25: |
Continue to:
- Add one last size 11/0 bead and tie off, pass the excess string back through the piece.
|
|
 |
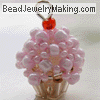
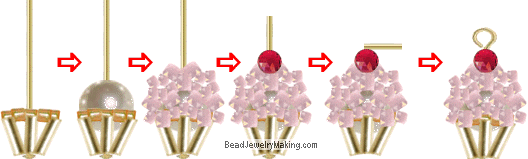
| Step 26: |
Putting the cupcake together:
- Take one long head pin.
- Add in the cupcake cup that you just made with the long bugles.
- Add in an insert bead (around 5mm) you can measure which size of insert bead works best here.
- Add on the pink cupcake top.
- Add on a red bead to be the cherry (size up to you) on the cupcake.
- Using a wire cutter, cut away excess head pin, leaving only around 1 centimeter of head pin wire.
- Using pliers, bent the remaining 1 cm of head pin wire at an 90degree angle.
- Using round tip pliers, bent and curl the head pin wire from tip inwards to achieve a circle ring.
|
|
 |