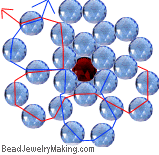
| Step 1: |
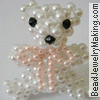
Blue beads represents the body color, Black beads represents the nose and eyes, the red beads represents the bow on the bear's neck.
Head:String on six beads (the color you chose for the body) and cross both threads at the last added bead, make sure you balance out both end of the thread. This is where the head is behind the nose.
|
|
 |
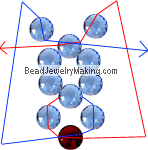
| Step 2: |
Nose: Now add one more bead on each side of the thread, add one more black bead for the nose, crisscross both thread through this black bead.
Add one more bead on each side of the thread again and crisscross both thread back through the bead on top in step 1 photo.
Remember to pull tight!
You should have a 3D nose now. |
|
 |
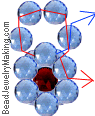
| Step 3: |
Head Continue: Face the nose away from you, take the left thread, add on 4 beads and cross the right thread through the last added bead.
Continue to string the left string out of the next adjoining bead. |
|
 |
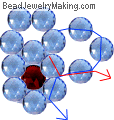
| Step 4: |
Now continue the momentum: use the left thread, add 3 beads, cross the right thread through the last added bead.
Continue to string the left string out of the nest adjoining bead. |
|
 |
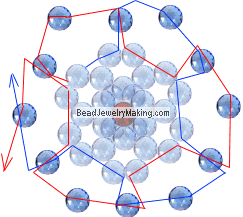
| Step 5: |
Now I'll go a bit faster: Repeat the step 4 process 3 more times.
The last beaded circle here: Add 2 beads on the left thread (remember to string the right thread back through two adjoining beads then pass it cross it through the last bead added on the left thread) |
|
 |
| Step 6: |
String the right thread back through the adjoining bead.
Add 3 beads on the left thread and cross the right thread through the last added bead.
String the right thread back through two adjoining bead.
Add two beads on the left thread and cross the right thread through the last added bead - repeat this 3 more times.
Last bead circle here: String the right thread back through 3 adjoining beads. Add one bead and crisscross both thread through this new added bead.
The head is almost done - just need to add the eyes and ears so you can tie off and string the excess thread back through the piece in any order for a more secure piece. |
|
 |
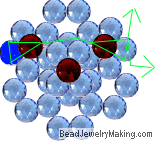
| Step 7: |
The Eyes: Cut a new short thread, pass it through the bead I highlighted in darker blue.
Add a new black bead on both threads, pass the strings through the bead on the top of the nose, add one more black bead through both threads and crisscross it through the bead that is directly opposite the one you started the string on.
Tie off and string the excess thread back through the piece in any order for a more secure piece. |
|
 |
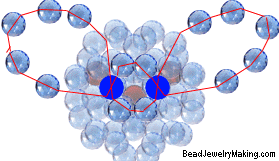
| Step 8: |
The Ears: Turn the bear face away from you. Cut a piece of short craft wire (25 gauge or 25 mm) start on one of the highlighted blue beads, add 5 beads on the left wire and pass it back through the same highlighted blue bead where you started.
Pass the left wire through the bottom three adjoining beads (from the 6 bead circle on the back of the bear's head) until it comes out from the next highlighted blue bead. Do the same with the right wire but pass it through the top 3 and exiting at the same highlighted blue bead, add 5 new beads on the right wire and tie off.
You can always hide the wire by looping them back into the head piece (no specific order) just for hiding the ends and more security. |
|
 |
| Step 9: |
Body:
Repeat step 1, step 3, step 4, step 5 of the beaded teddy bear project (make sure you skip step 2)! |
|
 |
|
I have to continue this on Page 2 or this page will load forever!
Click here to go Page 2
|
|
|
| Other Project |
Adult Project |
Flower Project |
Jewelry Project |
| Kid Art Project |
Bead Project |
Ring and Bracelet
Project |
|
|
|
| Check out our Bead Project page or
Photo Gallery for more Ideas |
Disclaimer: The information in each project is submitted by our users and presented in good faith, but no warranty is given, nor results guaranteed, nor is freedom from any patent to be inferred. Since we have no control over physical conditions surrounding the application of information herein contained,
BeadJewelryMaking.com disclaims any liability for untoward results or content.
Important: Please be sure to thoroughly read the instructions for all products, paying particular attention to all cautions and warnings shown to ensure the proper and safe use of the product for child safety in accordance to age safety standards.
Copyright: Users voluntarily submits their own content and the copyright belongs to the user themselves, but by submitting any and all information to BeadJewelryMaking.com users agrees that these information can be evaluated, use or not to use and amended by BeadJewelryMaking.com.
All Rights Reserved. No part of this Project may be reproduced in any form without permission in writing, except for your personal use, except by reviewer, who may in reviewing this project, quote brief passages in a magazine or newspaper. The viewer is granted a limited, non-transferable one-time license to print one copy of each printable page for personal use without specific permission. Further copying, distribution or use of any of the material herein, including without limitation printable pages, is prohibited.
|