|
The pictorials are illustrated with spaces between beads for a clearer direction, in the actual beading, there should be no spaces.
|
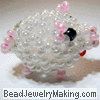
Beaded Piglet Charm :
Go back to page 1 of the tutorial!
Go back to page 2 of the tutorial!
|
|
|
| Step 49: |
- Continue to:
Add three white beads on the right (red) string, crisscross the left (black) string through the last white bead added.
Continue to pass the red string (the one you just used to add new beads on) through three old beads from step 40, 41 and 42 (marked A, B and C).
|
|
 |
| Step 50: |
- Continue to:
Add two white beads on the top (black) string, crisscross the bottom (red) string through the last white bead added.
Continue to pass the black string (the one you just used to add new beads on) through three old beads from step 42, 43 and 44 (marked A, B and C).
|
|

|
| Step 51: |
- Continue to:
Add one white and one pink or red (this will be the mouth) beads on the left
(red) string, crisscross the right (black) string through the last pink / red bead added.
Continue to pass the red string (the one you just used to add new beads on) through three old beads from step 44, 45 and 46 (marked A, B and C).
|
|
 |
| Step 52: |
- Continue to:
Add two white beads on the bottom left (black) string, crisscross the top right (red) string through the last white bead added.
Continue to pass the black string (the one you just used to add new beads on) through four old beads from step 46, 47, 48 and 49 (marked A, B,
C and
D).
|
|
 |
|
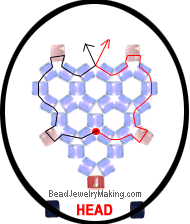
 Figure for step 53. Figure for step 53.
|
| Step 53: |
- Continue to:
Add one white beads on the bottom (red) string, crisscross the top (black) string through the last white bead added.
Continue to pass the red string (the one you just used to add new beads on) through four old beads from step 49, 50, 51 and 52 (marked A, B,
C and
D). Then back up the new bead you just added in this step.
- You should have a five bead circle shown:
- Do not tie or cut off yet, see the next step to make the snout.
|
|
| Step 54: |
- Continue to:
Add one white, one pink and one white beads on the bottom (black) string, crisscross the top (red) string through the last white bead added.
Continue to pass the black string (the one you just used to add new beads on) through one old bead from step 49 (marked A).
|
|
 |
| Step 55: |
- Continue to:
Add one pink and one white beads on the right (red) string, crisscross the left (black) string through the last white bead added.
Continue to pass the red string (the one you just used to add new beads on) through one old bead from step 50 (marked A).
|
|
 |
| Step 56: |
- Continue to:
Add one pink and one white beads on the top (black) string, crisscross the bottom (red) string through the last white bead added.
Continue to pass the black string (the one you just used to add new beads on) through one old bead from step 51 (marked A).
|
|
 |
| Step 57: |
- Continue to:
Add one pink and one white beads on the left (red) string, crisscross the right (black) string through the last white bead added.
Continue to pass the red string (the one you just used to add new beads on) through two old beads from step 52 and 54 (marked A
and B).
|
|
 |
| Step 58: |
- Continue to:
Add one pink bead on the left (black) string, crisscross the right (red) string through the last pink bead added.
Continue to pass the black string (the one you just used to add new beads on) through four old beads from step 54, 55, 56 and 57 (marked A, B,
C and
D). Continue to pass the same string back up through the pink bead added on this step.
- Tie off and pass the excess beads back through the piece for a more secure piece.
|
|
 |
| Step 59: |
- Tail: Cut a piece of short wire, around 3 to 4 inches.
Find the rear of the finished piglet body, look for the five white bead circle shown.
Pass the wire, entering two old white beads from the bead circle.
Add six pink beads, pass the wire back down the first five pink bead added and further down three old white beads from the bead circle.
Tie off or pass the remaining wire back further through the piece for a more secure tail.
- You can now twist the tail to form a slight coil or bend it in anyway you like.
|
|
 |
| Step 60: |
- Legs:
Cut a new piece of string, around 7cm long.
- Turn the piglet belly up (the diagram shows the belly of the pig).
- The red dot represents the center of the new string, pass each end through two old white beads, add one pink bead on each end of the string (this is the two front legs of the pig).
Continue to pass each end of the string through four old white beads, add one pink beads on each end of the string (this is the two hind legs of the piglet).
Continue to pass each string through two old white beads and tie off, cut away excess.
- You can now add jump rings on the top of the pig / piglet to act as a media for hanging as charms or pendants or earrings, whichever you can think of using it for.
|
|
 |