|
The pictorials are illustrated with spaces between beads for a clearer direction, in the actual beading, there should be no spaces.
|
|
Go back to page 2 of the Beaded Halloween 3D Pumpkin tutorial!
Go back to page 3 of the Beaded Halloween 3D Pumpkin tutorial!
|

|
|
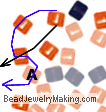
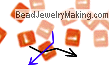
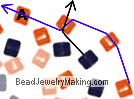
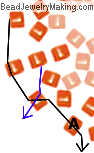
| Step 56: |
- Continue to:
Add two orange beads on the top (blue) string, crisscross the bottom (black) string through the last bead added.
Continue to pass the blue string (the one you just used to add new beads on) through one old bead from step 31 (marked A).
|
|
 |
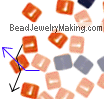
| Step 57: |
- Continue to:
Add one orange bead one one string and crisscross the other sting through this new bead added.
|
|
|
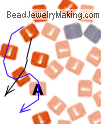
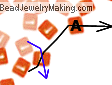
| Step 58: |
- Continue to:
Add two orange beads on the top (blue) string, crisscross the bottom (black) string through the last bead added.
Continue to pass the blue string (the one you just used to add new beads on) through one old bead from step 33 (marked A).
|
|
 |
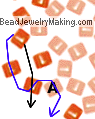
| Step 59: |
- Continue to:
Add one orange bead one one string and crisscross the other sting through this new bead added.
|
|
 |
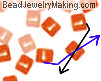
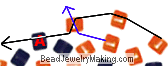
| Step 60: |
- Continue to:
Add two orange beads on the left (blue) string, crisscross the right (black) string through the last bead added.
Continue to pass the blue string (the one you just used to add new beads on) through one old bead from step 35 (marked A).
|
|
 |
| Step 61: |
- Continue to:
Add one orange bead one one string and crisscross the other sting through this new bead added.
|
|
 |
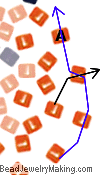
| Step 62: |
- Continue to:
Add two orange beads on the left (blue) string, crisscross the right (black) string through the last bead added.
Continue to pass the blue string (the one you just used to add new bead on) through one old bead from step 37 (marked A).
|
|
 |
| Step 63: |
- Continue to:
Add one orange bead on one of the string, crisscross the other end through this new bead.
|
|
 |
| Step 64: |
- Continue to:
Add two orange beads on the left (blue) string, crisscross the right (black) string through the last bead added.
Continue to pass the blue string (the one you just used to add new bead on) through one old bead from step 39 (marked A).
|
|
 |
| Step 65: |
- Continue to:
Add one orange bead on one of the string, crisscross the other end through this new bead.
- You can now add a big round bead or felt / cotton / fabric ball as the filling of the pumpkin head.
|
|
 |
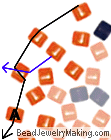
| Step 66: |
- Continue to:
Add two orange beads on the bottom left (blue) string, crisscross the top right (black) string through the last bead added.
Continue to pass the blue string (the one you just used to add new bead on) through one old bead from step 41 (marked A).
|
|
 |
| Step 67: |
- Continue to:
Add one orange bead on the bottom (black) string, crisscross the top (blue) string through the last bead added.
Continue to pass the black string (the one you just used to add new bead on) through one old bead from step 45 (marked A).
|
|
 |
| Step 68: |
- Continue to:
Add one orange bead on one of the string, crisscross the other end through this new bead.
|
|
 |
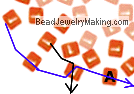
| Step 69: |
- Continue to:
Add three orange beads on the bottom left (black) string, crisscross the top right (blue) string through the last bead added.
Continue to pass the black string (the one you just used to add new bead on) through one old bead from step 46 (marked A).
|
|
 |
| Step 70: |
- Continue to:
Add two orange beads on the bottom (blue) string, crisscross the top (black) string through the last bead added.
Continue to pass the blue string (the one you just used to add new beads on) through one old bead from step 48 (marked A).
|
|
 |
| Step 71: |
- Continue to:
Add two orange beads on the bottom right (black) string, crisscross the top left (blue) string through the last bead added.
Continue to pass the black string (the one you just used to add new bead on) through one old bead from step 50 (marked A).
|
|
 |
| Step 72: |
- Continue to:
Add two orange beads on the bottom right (blue) string, crisscross the top left (black) string through the last bead added.
Continue to pass the blue string (the one you just used to add new beads on) through one old bead from step 52 (marked A).
|
|
|
| Step 73: |
- Continue to:
Add two orange beads on the right (black) string, crisscross the left (blue) string through the last bead added.
Continue to pass the black string (the one you just used to add new bead on) through one old bead from step 54 (marked A).
|
|
 |
| Step 74: |
- Continue to:
Add two orange beads on the right (blue) string, crisscross the left (black) string through the last bead added.
Continue to pass the blue string (the one you just used to add new beads on) through one old bead from step 56 (marked A).
|
|

|
| Step 75: |
- Continue to:
Add two orange beads on the top (black) string, crisscross the bottom (blue) string through the last bead added.
Continue to pass the black string (the one you just used to add new bead on) through one old bead from step 58 (marked A).
|
|
 |
| Step 76: |
- Continue to:
Add two orange beads on the top (blue) string, crisscross the bottom (black) string through the last bead added.
Continue to pass the blue string (the one you just used to add new beads on) through one old bead from step 60 (marked A).
|
|
 |
| Step 77: |
- Continue to:
Add two orange beads on the top (black) string, crisscross the bottom (blue) string through the last bead added.
Continue to pass the black string (the one you just used to add new bead on) through one old bead from step 62 (marked A).
|
|
 |
| Step 78: |
- Continue to:
Add two orange beads on the left (blue) string, crisscross the right (black) string through the last bead added.
Continue to pass the blue string (the one you just used to add new beads on) through one old bead from step 64 (marked A).
|
|
 |
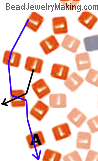
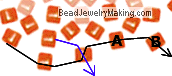
| Step 79: |
- Continue to:
Add two orange beads on the left (black) string, crisscross the right (blue) string through the last bead added.
Continue to pass the black string (the one you just used to add new bead on) through two old beads from step 66 and 69 (marked A and B).
|
|
 |
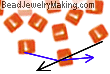
| Step 80: |
- Continue to:
Add one orange bead on one of the string, crisscross the other end through this new bead.
|
|
 |
|
Continue the tutorial on page 5 of the beaded Halloween pumpkin charm project!
|