Beaded Seahorse
Back to page 1 of the full seahorse tutorial.
Back to page 2 of the full seahorse tutorial.
Back to page 3 of the full seahorse tutorial.
Back to page 4 of the full seahorse tutorial.
Back to page 5 of the full seahorse tutorial.
Back to page 6 of the full seahorse tutorial.
Back to page 7 of the full seahorse tutorial.
Back to page 8 of the full seahorse tutorial.
Back to page 9 of the full seahorse tutorial.
|
 |
|
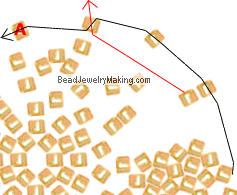
| Step 97: |
Continue to:
- Add three gold beads on the bottom (black) string and crisscross the top (red) string through the last bead added.
Continue to pass the black string (the one you used to add new beads on this step) through one old bead marked
A.
|
|
 |
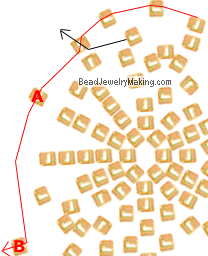
| Step 98: |
Continue to:
- Add three gold beads on the right (red) string and crisscross the bottom (black) string through the last bead added.
Continue to pass the red string (the one you used to add new beads on this step) through two old beads marked
A and B.
|
|
 |
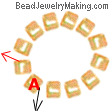
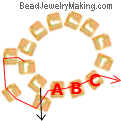
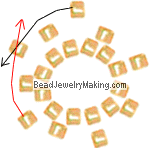
| Step 99: |
Continue to:
- Add two gold beads on the top (black) string and crisscross the bottom (red) string through the last bead added.
Continue to pass the black string (the one you used to add new beads on this step) through one old bead marked
A.
- You should have the belly of the seahorse almost done by now and here's how the bottom ring of beads should look like now:
|
|
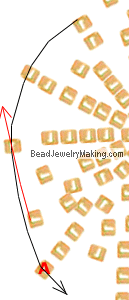 |
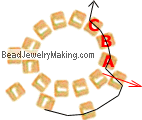
| Step 100: |
Continue to:
- Add three gold beads on the top (red) string and crisscross the bottom (black) string through the last bead added.
Continue to pass the red string (the one you used to add new beads on this step) through three old beads marked
A,
B and
C.
|
|
 |
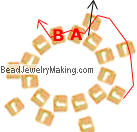
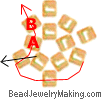
| Step 101: |
Continue to:
- Add two gold beads on the left (black) string and crisscross the right (red) string through the last bead added.
Continue to pass the black string (the one you used to add new beads on this step) through three old beads marked
A,
B and C
|
|
 |
| Step 102: |
Continue to:
- Add two gold beads on the bottom (red) string and crisscross the top (black) string through the last bead added.
Continue to pass the red string (the one you used to add new beads on this step) through two old beads marked
A and B.
|
|
 |
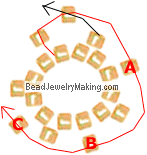
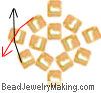
| Step 103: |
Continue to: (work this step in the opposite direction - clockwise)
- Add two gold beads on the left (red) string and crisscross the right (black) string through the last bead added.
Continue to pass the red string (the one you used to add new beads on this step) through three old beads marked
A,
B and
C.
|
|
 |
| Step 104: |
Continue to:
- Add one gold bead to crisscross both strings through ash shown.
- You should end up with this:
 which I will turn the direction into: which I will turn the direction into:
 from next step onwards. from next step onwards.
- Also you will not be using the upper four beads including those marked anymore (those are the beads on the bottom belly of the seahorse.
You will be using the bottom four beads which is the bottom backside of the seahorse.
|
|
 |
| Step 105: |
Continue to: (the tail)
- Add three gold beads on the left (red) string and crisscross the right (black) string through the last bead added.
Continue to pass the red string (the one you used to add new beads on this step) through one old bead marked
A.
|
|
 |
| Step 106: |
Continue to:
- Add two gold beads on the top (black) string and crisscross the bottom (red) string through the last bead added.
Continue to pass the black string (the one you used to add new beads on this step) through two old beads marked
A and B.
|
|
 |
| Step 107: |
Continue to:
- Add two gold beads on the right (red) string and crisscross the left (black) string through the last bead added.
Continue to pass the red string (the one you used to add new beads on this step) through two old beads marked
A and B.
|
|
 |
| Step 108: |
Continue to:
- Add one gold bead to crisscross both strings through, as shown.
|
|
 |
|
Continue the tutorial on page11 of the beaded 3D Seahorse project!
|