Beaded Crystal Fish
What you need:
1) Crystal Bicones (16pcs 3mm crystal bicone, 38pcs 4mm crystal bicone
{including two black 4mm for the eyes} using color combinations of choice)
2) Beading string (0.25mm).
|

PDF version help contributed by Marilyn Southmayd |
|
| Step 1: |
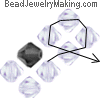
Cut a piece of beaded string around half meter long.
- Add four 4mm crystal bicones (make sure the third crystal added is black - for the eye) at the center of the string and crisscross through the last added crystal to form a crystal circle as shown.
|
|

|
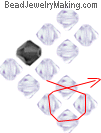
| Step 2: |
Continue to: (work with one side of the string at one time)
- Add four 4mm crystal bicones on the top (black) string and cross the same string back down through the first crystal added in this step (shown where the string crisscrosses).
- Repeat the above for the bottom string - Add four 4mm crystal bicones on the bottom (red) string and cross the same string back up through the first crystal added in this step (shown where the string crisscrosses).
|
|
|
| Step 3: |
Continue to:
- Add one 4mm crystal bicone and crisscross both strings through this new added crystal.
|
|

|
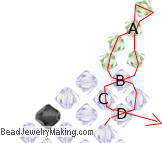
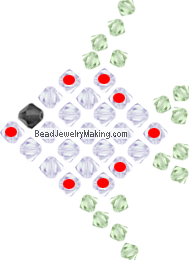
| Step 4: |
Continue to: (work with one side of the string at one time)
- Add three 4mm and four 3mm crystal bicones on the top (red) string.
Continue to pass this same string down the third 3mm crystal you just added (marked A)
Continue to add one 3mm crystal bicone and continue to pass the string down through three old 4mm crystals marked B, C and D.
- Repeat the above for the bottom string - Add three 4mm and four 3mm crystal bicones on the bottom (black) string.
Continue to pass this same string up the third 3mm crystal you just added (marked A)
Continue to add one 3mm crystal bicone and continue to pass the string up through three old 4mm crystals marked B, C and D.
|
|

|
| Step 5: |
Continue to:
- Add one 4mm crystal bicone and crisscross both strings through this new added crystal.
|
|
|
| Step 6: |
Continue to:
- Add one 4mm crystal bicone on each string (total of two) and one last 4mm crystal to crisscross both strings through.
|
|
|
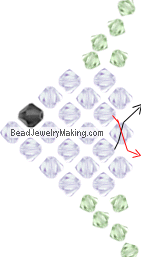
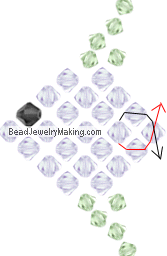
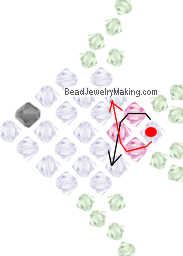
| Step 7: |
Continue to: (work with one side of the string at one time)
- Add three 3mm crystals on the top (red) string and pass this same string back down the 4mm crystal that you started off in this step.
- Repeat the above for the bottom string - Add three 3mm crystals on the bottom (black) string and pass this same string back down the 4mm crystal that you started off in this step.
- You have now finished one side of the fish, it's still not 3D, so we need to make the other side by continuing, so do not cut away excess strings yet.
This diagram with red dots which indicates where the strings will need to pass through on the next few steps to come.
|
|
|
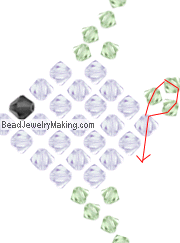
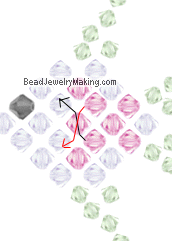
| Step 8: |
Continue to: (The pink crystals indicates new crystals added)
- Add one 4mm crystal bicone on each string (total of two) and one last 4mm crystal to crisscross both strings through.
|
|
|
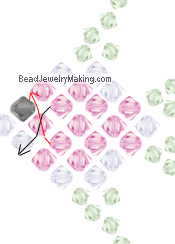
| Step 9: |
Continue to: (work with one side of the string at one time)
- On the top red string:
Add two 4mm crystal bicones, continue to pass this same string back up two old 4mm crystal marked A, B and down further through the first crystal added on this string on this step.
- On the bottom black string:
Add two 4mm crystal bicones, continue to pass this same string back down two old 4mm crystal marked C, D and up further through the first crystal added on this string on this step.
|
|

|
| Step 10: |
Continue to:
- Add one 4mm crystal bicone and crisscross both strings through this new added crystal.
|
|
|
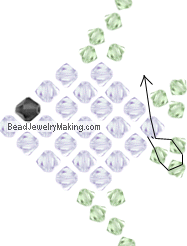
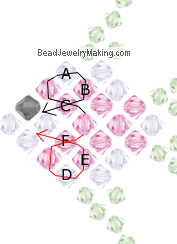
| Step 11: |
Continue to: (work with one side of the string at one time)
- On the top black string:
Add two 4mm crystal bicones, continue to pass this same string back up old 4mm crystals marked A, B and C.
- On the bottom red string:
Add two 4mm crystal bicones, continue to pass this same string back down old 4mm crystals marked D, E and F.
|
|
|
| Step 12: |
Continue to:
- Add one 4mm crystal bicone and crisscross both strings through this new added crystal.
|
|
|
| Step 13: |
Continue to:
- Add one 4mm crystal bicone on the bottom (black) string.
Add one 4mm black crystal bicone on the top (red) string, continue to pass this string through one old crystal marked A. Tie off and pass the excess string back through the piece for more security.
- Now you can add a hook or jump ring on the top fin to wear it as a charm or earrings or pendant!
|
|

|