|
The pictorials are illustrated with spaces between beads for a clearer direction, in the actual beading, there should be no spaces.
|
Beaded 3D Pear Charm:
What you need:
1) Glass seed beads size 11/0 (four different shades of green).
2) Beading string (0.25mm), one long head pin, one 5mm, one 4mm and one 3mm bead as filling bead.
Always Remember to pull tight on EVERY STEP.
|

|
|
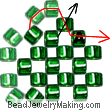
| Step 1: |
Cut a piece string around one metre long.(tip: you should be starting with the darkest beads and work with a shade lighter on each phrase)
- Add four darkest green beads at the exact centre of the string, crisscross the other end through the last bead added.
Make sure this beaded ring is centralized at the centre of the string.
|
|
 |
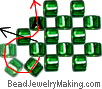
| Step 2: |
- Continue to:
Add three darkest green beads on the top (black) string and crisscross the other (red) string through the last bead added.
|
|
 |
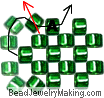
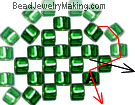
| Step 3: |
- Continue to:
Add three darkest green beads on the right (red) string and crisscross the other (black) string through the last bead added.
Continue to pass the red string (the one you used to add new beads on this step) through one old bead from step 1, marked
A.
|
|
 |
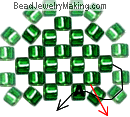
| Step 4: |
- Continue to:
Add two darkest green beads on the bottom right (black) string and crisscross the other (red) string through the last bead added.
|
|
 |
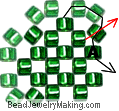
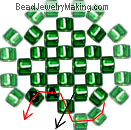
| Step 5: |
- Continue to:
Add one darkest green, two medium green and one darkest green beads on the bottom (red) string and crisscross the other (black) string through the last bead added.
Continue to pass the red string (the one you just used to add new beads on) through one old bead from step 1 (marked A).
|
|
|
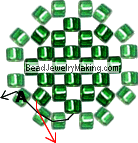
| Step 6: |
- Continue to:
Add two medium green and one darkest green beads on the bottom left (black) string and crisscross the other (red) string through the last bead added.
Continue to pass the black string (the one you just used to add new beads on) through one old bead from step 1 (marked A).
|
|
 |
| Step 7: |
- Continue to:
Add two medium green and one darkest green beads on the left (red) string and crisscross the other (black) string through the last bead added.
Continue to pass the red string (the one you just used to add new beads on) through one old bead from step 2 (marked A).
|
|
 |
| Step 8: |
- Continue to:
Add two medium green and one darkest green beads on the top left (black) string and crisscross the other (red) string through the last bead added.
Continue to pass the black string (the one you just used to add new beads on) through one old bead from step 2 (marked A).
|
|
 |
| Step 9: |
- Continue to:
Add two medium green and one darkest green beads on the top (red) string and crisscross the other (black) string through the last bead added.
Continue to pass the red string (the one you just used to add new beads on) through one old bead from step 3 (marked A).
|
|
 |
| Step 10: |
- Continue to:
Add two medium green and one darkest green beads on the top right (black) string and crisscross the other (red) string through the last bead added.
Continue to pass the black string (the one you just used to add new beads on) through one old bead from step 3 (marked A).
|
|
 |
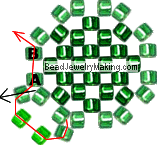
| Step 11: |
- Continue to:
Add two medium green and one darkest green beads on the right (red) string and crisscross the other (black) string through the last bead added.
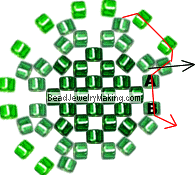
Continue to pass the red string (the one you just used to add new beads on) through two old beads from step 4 and 5 (marked A and B).
|
|
 |
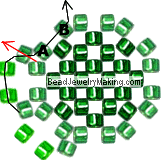
| Step 12: |
- Continue to:
Add two medium green beads on the right (black) string and crisscross the other (red) string through the last bead added.
Continue to pass the black string (the one you just used to add new beads on) through one old bead from step 5 (marked A).
- Before you continue to the next step, you can put the beading down for a while and make the inner bead filling:
 Take the eye pin, add the 5mm, 4mm and the 3mm bead filling. You can bent the tip a little to prevent them from falling back out. Take the eye pin, add the 5mm, 4mm and the 3mm bead filling. You can bent the tip a little to prevent them from falling back out.
Now you will be sort of bead around the bead filling that you just did.
|
|
 |
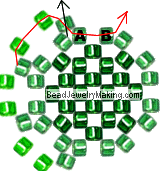
| Step 13: |
- Continue to:
Add one medium green, two medium light green and one more medium green beads on the bottom right (red) string and crisscross the other (black) string through the last bead added.
Continue to pass the red string (the one you just used to add new beads on) through two old beads (marked A and B).
|
|
 |
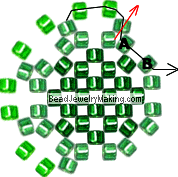
| Step 14: |
- Continue to:
Add two medium light green and one medium green beads on the bottom (black) string and crisscross the other (red) string through the last bead added.
Continue to pass the black string (the one you just used to add new beads on) through two old beads (marked A and B).
|
|
 |
| Step 15: |
- Continue to:
Add two medium light green and one medium green beads on the bottom left (red) string and crisscross the other (black) string through the last bead added.
Continue to pass the red string (the one you just used to add new beads on) through two old beads (marked A and B).
|
|
 |
| Step 16: |
- Continue to:
Add two medium light green and one medium green beads on the left (black) string and crisscross the other (red) string through the last bead added.
Continue to pass the black string (the one you just used to add new beads on) through two old beads (marked A and B).
|
|
 |
| Step 17: |
- Continue to:
Add two medium light green and one medium green beads on the top (red) string and crisscross the other (black) string through the last bead added.
Continue to pass the red string (the one you just used to add new beads on) through two old beads (marked A and B).
|
|
 |
|
|