| Step 1: |
Before you start, always remember to pull tight on every step.
The Hat:
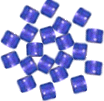
Cut a piece of string around one third meter long.
Click here and follow step 1, 2 and 3 of the instruction there.
After that, tie off and string excess strings back through the piece to hid it and strengthen the knot.
Set this aside for later use.
|
|
 |
| Step 2: |
The Body:
Cut a piece of string around a meter long
Repeat what you did from step 1 (but do not tie off or cut away excess strings)
OR
You can do exactly the same in step 1 and continue with a new piece of string.
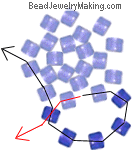
Your starting string for this step should be each end coming out of a bead that is next to each other and forming a slightly V shape (shown in the pictorial where the red and black line meet and start off)
Take the right (black) line, add on 5 seed beads, cross the left (red) line through the last added bead, continue to pass the previous line (black) through the next two beads (that forms the V Shape) on it's path.
|
|
 |
| Step 3: |
This is similar with step 2 except for the number of beads added.
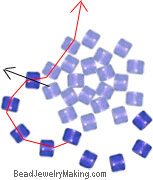
Take the bottom (red) line, add on 4 seed beads, cross the top (black) line through the last added bead, continue to pass the previous line (red) through the next two beads (that forms the V Shape) on it's path.
|
|
 |
| Step 4: |
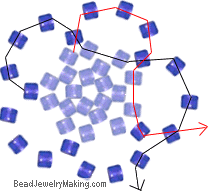
Repeat step 3 two more times, before starting on the last bead circle, after the final looping through the V Shape beads, loop he line (red through one more bead that is pointing outwards).
Last bead circle: Add on 3 beads on the right line (black) instead of the usual 4 beads, cross the left / bottom line (red) through the last added bead, cross the previous line (black) through the next bead from step 2 that's on it's path.
Pull tight and you should have a round cone shape. |
|
 |
| Step 5: |
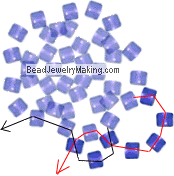
Now you will repeat step 2 again (adding 5 beads the same way, but looping the line after that through one bead beside it not two).
The 4 bead RAW: Followed by taking the right (black) line, add two seed beads, cross the other line (red) through the last added bead, pass the previous line (black) through the next two beads on it's path. |
|
 |
| Step 6: |
Now you will repeat step 3 (adding 4 beads the same way, but looping the line after that through one bead beside it not two).
Then repeat the 4 bead RAW from step 5.
Keep repeating in this order:
- Step 3 (with the looping difference);
- 4 bead RAW from step 5;
- Step 3 (with the looping difference);
- 4 bead RAW from step 5;
- Step 3 (with the looping difference)
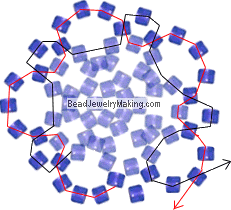
Then finally the ending 4 bead RAW, but this time you only need to add on one bead and crisscross both lines through the very first bead added from step 5 (where you repeated step 2).
Further loop the line (black) all the way through 5 beads on it's path.
Further loop the line (red) all the way through the next two beads on it's path.
So that the two lines crosses and come out of the middle bead at the very bottom as shown. |
|
 |
| Step 7: |
Now you see which line is longer, take that line (let's say it's the red line);
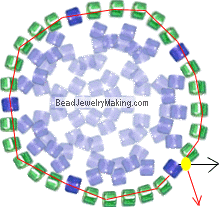
Take the red line, add on 5 green color beads;
loop the line through the center bead (blue) of the next big bead circle;
Add on 5 green color beads;
loop the line through the center bead (blue) of the next big bead circle;
Add on 5 green color beads;
loop the line through the center bead (blue) of the next big bead circle;
Add on 5 green color beads;
loop the line through the center bead (blue) of the next big bead circle;
Add on 5 green color beads;
Tie off at the yellow dot, remember if you want to strengthen your knot and piece, loop the lines back through the piece (no specific order). |
|
 |
| Step 8: |
Wings:
Now that you have the complete dress cone, to add on the wings:
Look for the top part (which you made in step 2 following) cut a piece of wire around 1/3 meter long, pass it through one of the bead on the very top of the dress cone;
Balance out both ends of the wire.
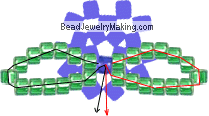
Take one side, add on 13 green beads and loop the wire back through the bead on the body where you started on.
Take the other side, do exactly the same.
Tie off the wire and loop it back into the piece so that you have a more secure knot.
Shape the wings out of the two wired bead circle. |
|
 |
| Step 9: |
Putting it together:
Take the eye pin, put on a 3mm bead;
Put on the body of the angel (represented by the big inverted U);
Put on the large Pearl;
Put on the Beaded Cap from step 1;
using round head pliers, twist the end of the eye pin into a wire circle and add on the accessory parts you need.
|
|
 |
|
|


