|
The pictorials are illustrated with spaces between beads for a clearer direction, in the actual beading, there should be no spaces.
|
|
Back to page 1 of the full tutorial!
Always Remember to pull tight on EVERY STEP.
|

|
|
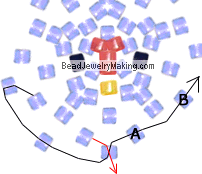
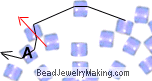
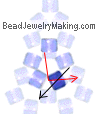
| Step 18: |
- Continue to:
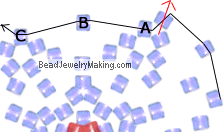
Add three white beads on the top left (black) string, crisscross the bottom right (red) string through the last bead added.
Continue to pass the black string (the one you just used to add new beads on) through two old beads from step 13 and 14 (marked A and B).
|
|
 |
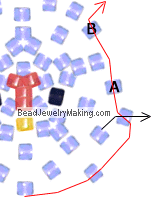
| Step 19: |
- Continue to:
Add two white beads on the bottom (red) string, crisscross the top (black) string through the last bead added.
Continue to pass the red string (the one you just used to add new beads on) through two old beads from step 14 and 15 (marked A and B).
|
|
|
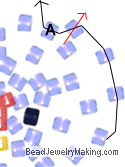
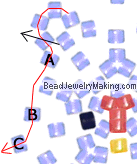
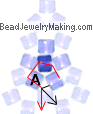
| Step 20: |
- Continue to:
Add three white beads on the bottom (black) string, crisscross the top (red) string through the last bead added.
Continue to pass the black string (the one you just used to add new beads on) through one old bead from step 15 (marked A).
|
|
 |
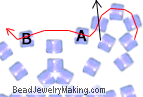
| Step 21: |
- Continue to:
Add three white beads on the right (red) string, crisscross the left (black) string through the last bead added.
Continue to pass the red string (the one you just used to add new beads on) through two old beads from step 16 and 16 (marked A and B).
|
|
 |
| Step 22: |
- Continue to:
Add two white beads on the right (black) string, crisscross the left (red) string through the last bead added.
Continue to pass the black string (the one you just used to add new beads on) through one old bead from step 16 (marked A).
|
|
 |
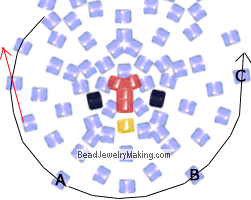
| Step 23: |
- Continue to:
Add three white beads on the top (red) string, crisscross the bottom (black) string through the last bead added.
Continue to pass the red string (the one you just used to add new beads on) through three old beads from step 16, 17 and 18 (marked A, B and
C).
|
|
 |
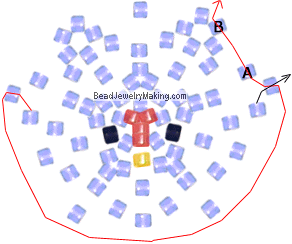
| Step 24: |
- Continue to:
Add two white beads on the top (black) string, crisscross the bottom (red) string through the last bead added.
Continue to pass the black string (the one you just used to add new beads on) through three old beads from step 18, 19 and 20 (marked A, B and
C).
|
|
 |
| Step 25: |
- Continue to:
Add two white beads on the left (red) string, crisscross the right (black) string through the last bead added.
Continue to pass the red string (the one you just used to add new beads on) through two old beads from step 20 and 21 (marked A and B).
|
|
 |
| Step 26: |
- Continue to:
Add two white beads on the bottom (black) string, crisscross the top (red) string through the last bead added.
Continue to pass the black string (the one you just used to add new beads on) through three old beads from step 21, 22 and 23 (marked A, B and
C).
|
|
 |
| Step 27: |
- Continue to:
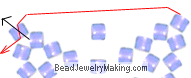
Add one white bead on the right (red) string, crisscross the left (black) string through the last bead added.
|
|
 |
| Step 28: |
- Continue to: (Note: the bead with the red dot is where you stop in step 27)
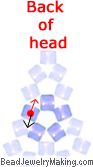
What you see here is the chicken's rear side.
Take the top left (black) string, pass it through four old beads (marked A, B, C and D) and tie off before you pass the same string back up through the bead with the red dot you started this step with.
Do not do anything with the other side of the string on this step.
|
|
 |
| Step 29: |
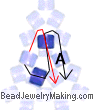
- The Chicken's Tail: Cut a new piece of string around 3 inches long, pass it through one of the old bead on the chicken's back marked with the red dot.
- Continue to: (I have changed the colors of the bead for clearer directions, the dark blue beads will be the newly added beads on each step)
Add two white beads on the bottom (black) string, crisscross the top (red) string through the bead added.
Continue to pass the black string (the one you just used to add new beads on) through one old bead marked A.
|
|
|
| Step 30: |
- Continue to:
Add one white bead to crisscross both strings through.
|
|
 |
| Step 31: |
- Continue to:
Add one white bead on the top (red) string, continue to pass this same red string through one old bead from step 29 (marked A).
- Tie off.
|
|
 |
|
Continue the tutorial on page 3 of the beaded 3D Chicken project!
|