| Step 1: |
Before you start, if this is your first attempt at 3-D RAW figures, I would suggest you start with the beaded angel project by clicking here.
Always Remember to pull tight on EVERY STEP.
- Cut a piece of string around a meter long.
Add 5 silver white seed beads at the middle of this string and crisscross both ends of the string through the last added bead. (remember to balance out both ends of the string so that they are of the same length)
|
|
 |
| Step 2: |
- Take the left (black) end of the string, add on 5 silver white beads, cross the right (red) end of the string through the last added bead (shown where the red arrow is coming out from).
After you have formed the bead circle, pass the top (black) end of the string through a bead on the top (from step 1's bead circle) as shown where the black arrow is coming out from.
|
|

|
| Step 3: |
- Take the bottom (red) end of the string, add on 4 silver white beads, cross the other end (black) through the last added bead (shown where the black arrow is coming out of).
After forming this bead circle, pass the left (red) string through a bead from step 1 (shown where the red arrow is coming out of).
|
|
 |
| Step 4: |
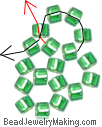
- Repeat step 3 again, take the right (black) end of the string, add 4 beads, cross the other end (red) through the last added bead (shown where the red arrow is coming out of).
After forming this bead circle, pass the left (black) string through a bead from step 1 (shown where the black arrow is coming out of).
|
|
 |
| Step 5: |
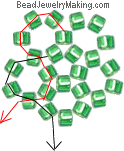
- Repeat step 4, by taking the top (red) end of the string, add on 4 silver white beads, cross the other end (black) through the last added bead.
After forming this bead circle, pass the right (red) string through a bead from step 1 and further through one bead from step 2 (first bead added on step 2).
- For the last bead circle here: take the left (black) end of the string, add on 3 silver white beads, cross the other end (red) through the last added bead.
After forming the last bead circle, pass the right (black) end of the string through the bead next to it from step 2 (shown where the black arrow is coming out of).
|
|
 |
| Step 6: |
- Now that you get the concept of RAW, we will be going faster.
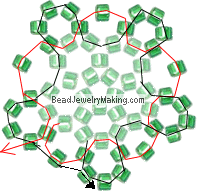
Continue by working anti-clockwise again: You should realize that you are always adding beads on the left hand string and crisscrossing with the right hand string and looping back through old beads after completing a circle and with the string pointing towards the inside of the whole piece of creation.
- Take the left string, add 3 silver white beads, crisscross the other end through the last added bead, loop the string pointing towards the inside of the piece through one bead from the previous beaded circle (shown where the beads are in lighter color).
- Continue to add silver white beads this way but with different number of beads each time.
Next take left string, add 4 beads, crisscross both lines, pass through old beads.
Next take left string, add 2 beads, crisscross both lines, pass through old beads.
Next take left string, add 4 beads, crisscross both lines, pass through old beads.
Next take left string, add 2 beads, crisscross both lines, pass through old beads.
Next take left string, add 4 beads, crisscross both lines, pass through old beads.
Next take left string, add 2 beads, crisscross both lines, pass through old beads.
Next take left string, add 4 beads, crisscross both lines, pass through old beads.
Next take left string, add 2 beads, crisscross both lines, pass through old beads. (note you have to pass the string further after the old beads, through the very first bead added on this step)
Next take left string, add 3 beads, crisscross both lines, pass through beads. (note you have to pass the right string through the next 2 bead beside it - shown where the black arrow is coming out of).
Now your piece should be a slight half sphere shape if you follow the first instruction to pull tightly on every step.
|
|
 |
| Step 7: |
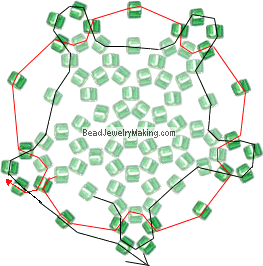
- Following the principle of: Always adding beads on the left hand string and crisscrossing with the right hand string and looping back through old beads after completing a circle and with the string pointing towards the inside of the whole piece of creation.
We shall continue to add silver white beads this way but with different number of beads each time.
Take left string, add 3 beads, crisscross lines, pass through 1 old bead.
Take left string, add 3 beads, crisscross lines, pass through 3 old beads.
Take left string, add 2 beads, crisscross lines, pass through 1 old bead.
Take left string, add 3 beads, crisscross lines, pass through 3 old beads.
Take left string, add 2 beads, crisscross lines, pass through 1 old bead.
Take left string, add 3 beads, crisscross lines, pass through 3 old beads.
Take left string, add 2 beads, crisscross lines, pass through 1 old bead.
Take left string, add 3 beads, crisscross lines, pass through 3 old beads.
Take left string, add 2 beads, crisscross lines, pass through 1 old bead. (note you have to pass the string further after the old bead, through the very first bead added on this step)
Take left string, add 2 beads, crisscross lines, pass through beads. (note you have to pass the right string through the next 2 bead beside it - shown where the black arrow is coming out of).
|
|
 |
| Step 8: |
- Following the principle of: Always adding beads on the left hand string and crisscrossing with the right hand string and looping back through old beads after completing a circle and with the string pointing towards the inside of the whole piece of creation.
We shall continue to add silver white beads this way but with different number of beads each time.
Take left string, add 3 beads, crisscross lines, pass through 3 old beads.
Take left string, add 2 beads, crisscross lines, pass through 3 old beads.
Take left string, add 2 beads, crisscross lines, pass through 3 old beads.
Take left string, add 2 beads, crisscross lines, pass through 3 old beads. (note you have to pass the string further after the old bead, through the very first bead added on this step)
Take left string, add 1 beads, crisscross lines.
You should have one round beaded ball now, this is the head.
Do not cut away the string yet as you can proceed directly to bead the body from here.
|
|
 |
| Step 9: |
-
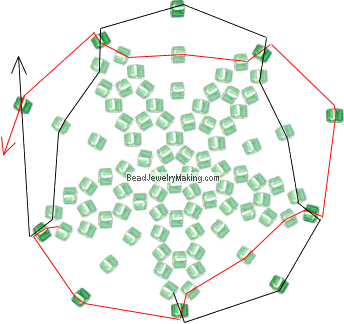
When you ended on step 8, you should get a 5 bead circle ending as shown in this picture. From there repeat step 2 to step 5 (note not on a new string but on the string attached on the five bead circle on the beaded ball head) using the ending 5 bead circle the same way as the 5 bead circle in step 1.
Continue this tutorial on page 2.
|
|

|
|
|


