|
The pictorials are illustrated with spaces between beads for a clearer direction, in the actual beading, there should be no spaces.
|
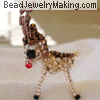
Beaded Reindeer :
Return to page one of the tutorial!
Return to page two of the tutorial!
Return to page three of the tutorial!
Always Remember to pull tight on EVERY STEP.
|
|
|
| Step 42: |
- Continue to:
Add one beige, one white and one brown beads on the bottom (red) string, crisscross the top (black) string through the last bead added.
Continue to pass the red string (the one you just used to add new beads on) through two old beads from step 37 and step 38 (marked A
and B).
|
|
 |
| Step 43: |
- Continue to:
Add three brown beads on the right (black) string, crisscross the left (red) string through the last bead added.
Continue to pass the black string (the one you just used to add new beads on) through
three old beads from step 38, step 39 and step 40 (marked A, B and C).
|
|

|
| Step 44: |
- Continue to:
Add one white and one beige beads on the top (red) string, crisscross the bottom (black) string through the last bead added.
Continue to pass the red string (the one you just used to add new beads on) through one old bead from step 40 (marked A).
- Now it's about time to insert the 5mm followed by a 4mm internal beads as filling for the reindeer's body.
|
|
 |
| Step 45: |
- Continue to:
Add two beige and one white beads on the top (black) string, crisscross the bottom (red) string through the last bead added.
Continue to pass the black string (the one you just used to add new beads on) through two old beads from step 40 and step 41 (marked A
and B).
|
|
 |
| Step 46: |
- Continue to:
Add two white beads on the left (red) string, crisscross the right (black) string through the last bead added.
Continue to pass the red string (the one you just used to add new beads on) through two old beads from step 41 and step 42 (marked A
and B).
|
|
 |
| Step 47: |
- Continue to:
Add two beige beads on the bottom (black) string, crisscross the top (red) string through the last bead added.
Continue to pass the black string (the one you just used to add new beads on) through two old beads from step 42 and step 43 (marked A
and B).
|
|
 |
| Step 48: |
- Continue to:
Add one beige and one brown beads on the right (red) string, crisscross the left (black) string through the last bead added.
Continue to pass the red string (the one you just used to add new beads on) through two old beads from step 43 and step 44 (marked A
and B).
|
|
 |
|

|
| Step 49: |
- Continue to:
Add one beige bead on the top right (black) string, crisscross the bottom left (red) string through the last bead added.
Continue to pass the black string (the one you just used to add new beads on) through four old beads from step 45, 46, 47 and 48 (marked A, B, C and D).
|
|
| Step 50: |
- Continue to:
Add one brown, one beige, one white and one beige beads on the left (red) string, crisscross the right (black) string through the first brown bead added.
Tie off and for a more secure piece, pass the excess thread back through the piece.
|
|
 |
| Step 51: |
- Legs: Cut a piece of wire around 6 to 7 inches long.
Pass the wire through six old beads on the reindeer's backside (just below the tail).
On the left (red) wire, add seven beige beads and one black bead, pass the same wire back up through the first seven beige beads added.
Repeat the same thing for the right wire (black).
|
|

|
| Step 52: |
- Front Legs: Continue to:
with the left wire (red) pass it forward four old beads on the reindeer's body's side.
On the same wire, add seven beige beads and one black bead, pass the same wire back up through the first seven beige beads added.
Continue to pass the wire back up through two old beads on the front part of the reindeer's body.
Repeat for the other side of the wire for the other front leg.
- Pass the wires until they meet and tie off, cut away excess.
- You can add a jump ring to the deer's head between the antlers to hang it as a charm or Christmas decoration or ornament.
|
|
 |