|
The pictorials are illustrated with spaces between beads for a clearer direction, in the actual beading, there should be no spaces.
|
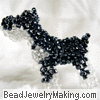
Beaded Schnauzer Charm :
Go back to page 1 of the tutorial!
Go back to page 2 of the tutorial!
Go back to page 3 of the tutorial!
Go back to page 4 of the tutorial!
Go back to page 5 of the tutorial!
Go back to page 6 of the tutorial!
|
|
|
| Step 125: |
- Continue to:
Add one white beads to crisscross both lines through.
|
|
 |
| Step 126: |
- Continue to:
Add three white beads on the right (red) string, crisscross the left (black) string through the last bead added.
Continue to pass the red string (the one you just used to add new beads on) through one old bead marked with A.
|
|

|
| Step 127: |
- Continue to:
Add two white beads on the bottom (black) string, crisscross the top (red) string through the last bead added.
Continue to pass the black string (the one you just used to add new beads on) through one old bead marked with A.
|
|
 |
| Step 128: |
- Continue to:
Add two white beads on the bottom (red) string, crisscross the top (black) string through the last bead added.
Continue to pass the red string (the one you just used to add new beads on) through one old bead marked with A.
|
|
 |
| Step 129: |
- Continue to:
Add two white beads on the left (black) string, crisscross the right (red) string through the last bead added.
Continue to pass the black string (the one you just used to add new beads on) through one old bead marked with A.
|
|
 |
| Step 130: |
- Continue to:
Add two white beads on the top (red) string, crisscross the bottom (black) string through the last bead added.
Continue to pass the red string (the one you just used to add new beads on) through two old beads marked with A and B.
|
|
 |
| Step 131: |
- Continue to:
Add one white beads to crisscross both lines through.
|
|
 |
| Step 132: |
- Continue to:
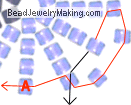
Add four white beads on the top (red) string, crisscross the bottom (black) string through the last bead added.
Continue to pass the red string (the one you just used to add new beads on) through one old bead marked with A.
|
|
 |
| Step 133: |
- Continue to:
Add three white beads on the right (black) string, crisscross the left (red) string through the last bead added.
Continue to pass the black string (the one you just used to add new beads on) through one old bead marked with A.
|
|
 |
| Step 134: |
- Continue to:
Add three white beads on the bottom (red) string, crisscross the top (black) string through the last bead added.
Continue to pass the red string (the one you just used to add new beads on) through one old bead marked with A.
|
|
 |
| Step 135: |
- Continue to:
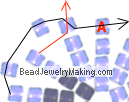
Add three white beads on the bottom (black) string, crisscross the top (red) string through the last bead added.
Continue to pass the black string (the one you just used to add new beads on) through one old bead marked with A.
|
|
 |
| Step 136: |
- Continue to:
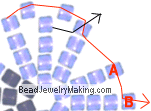
Add three white beads on the left (red) string, crisscross the right (black) string through the last bead added.
Continue to pass the red string (the one you just used to add new beads on) through two old beads marked with A and B.
|
|
 |
| Step 137: |
- Continue to:
Add two white beads on the left (black) string, crisscross the right (red) string through the last bead added.
|
|
 |
| Step 138: |
- Continue to:
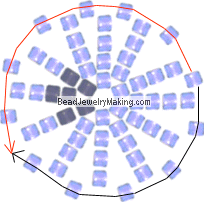
Pass both strings through the 12 external bead circle and tie off.
- Repeat steps 109 to 138 for the rear right leg (starting point of the rear right leg can be seen in the picture on step 108).
|
|
 |
| Step 139: |
- Front Legs' Positions:
The picture on the right shows where the front legs will be, the red dots represents where you should be adding new thread to start beading for each leg.
The tiny black dots represents where the leg's beading will revolve around.
|
|
 |
| Step 140: |
- Starting from the left front leg:
Cut one piece of new thread around 10cm long.
Add two gray and one white beads on the left (red) string, crisscross the right (black) string through the last bead added.
Continue to pass the red string (the one you just used to added new beads on) through one old bead from the body marked with A.
NOTE: the lightened areas represents the dog's body that you have already completed, ignore the lightened areas unless it's marked for passing through.
|
|
 |
| Step 141: |
- Continue to:
Add two white beads on the top (black) string, crisscross the bottom (red) string through the last bead added.
Continue to pass the black string (the one you just used to add new beads on) through one old bead
from the body marked with A.
|
|
 |
| Step 142: |
- Continue to:
Add two white beads on the right (red) string, crisscross the left (black) string through the last bead added.
Continue to pass the red string (the one you just used to add new beads on) through one old bead
from the body marked with A.
|
|
 |
| Step 143: |
- Continue to:
Add one white and one gray beads on the bottom right (black) string, crisscross the top left (red) string through the last bead added.
Continue to pass the black string (the one you just used to add new beads on) through one old bead from the body marked with A.
|
|
 |
| Step 144: |
- Continue to:
Add two gray beads on the bottom (red) string, crisscross the top (black) string through the last bead added.
Continue to pass the red string (the one you just used to add new beads on) through one old bead from the body marked with A and one old bead from step 140 marked with B.
|
|
 |
| Step 145: |
- Continue to:
Add one gray bead to crisscross both string through.
- You should have a beaded circle where the front left leg should be.

|
|
 |
|
Continue the tutorial on page 8 of the beaded Schnauzer dog charm project!
|


