|
The pictorials are illustrated with spaces between beads for a clearer direction, in the actual beading, there should be no spaces.
|
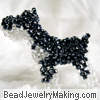
Beaded Schnauzer Charm :
Go back to page 1 of the tutorial!
Go back to page 2 of the tutorial!
Go back to page 3 of the tutorial!
Go back to page 4 of the tutorial!
Go back to page 5 of the tutorial!
Go back to page 6 of the tutorial!
Go back to page 7 of the tutorial!
|

|
|
| Step 146: |
- Continue to:
Add three gray beads on the bottom (red) string, crisscross the top (black) string through the last bead added.
Continue to pass the red string (the one you just used to add new beads on) through one old bead marked with A.
|
|
 |
| Step 147: |
- Continue to:
Add two white beads on the left (black) string, crisscross the right (red) string through the last bead added.
Continue to pass the black string (the one you just used to add new beads on) through one old bead marked with A.
|
|

|
| Step 148: |
- Continue to:
Add two white beads on the top (red) string, crisscross the bottom (black) string through the last bead added.
Continue to pass the red string (the one you just used to add new beads on) through one old bead marked with A.
|
|
 |
| Step 149: |
- Continue to:
Add two white beads on the right (black) string, crisscross the left (red) string through the last bead added.
Continue to pass the black string (the one you just used to add new beads on) through one old bead marked with A.
|
|
 |
| Step 150: |
- Continue to:
Add one white and one gray beads on the right (red) string, crisscross the left (black) string through the last bead added.
Continue to pass the red string (the one you just used to add new beads on) through one old bead marked with A and B.
|
|
 |
| Step 151: |
- Continue to:
Add one gray beads to crisscross both lines through.
|
|
 |
| Step 152: |
- Continue to:
Add two white and one gray beads on the bottom (red) string, crisscross the top (black) string through the last bead added.
Continue to pass the red string (the one you just used to add new beads on) through one old bead marked with A.
|
|
 |
| Step 153: |
- Continue to:
Add one white and one gray beads on the bottom (black) string, crisscross the top (red) string through the last bead added.
Continue to pass the black string (the one you just used to add new beads on) through one old bead marked with A.
- After this, go back to repeat step 122 to 138 to finish off the front left leg.
- For the front right leg:
Repeat step 140 to 153 but in opposite direction. If you look back at step 140, you were working clockwise for the front left leg. For the right front leg, work in anticlockwise direction instead.
The starting point of the right front leg can be seen in the diagram from step 139.
|
|
 |
| Step 154: |
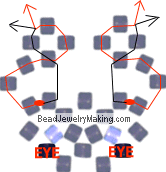
- Ears:
Use a short thread for each ear.
The red dots represents where the new strings should be passed through two old beads on the dog's head.
- Left ear: pass the new string through two old beads (marked by the red dot) on the dog's left head.
Add three gray beads on the left (red) string, crisscross the other string (black) through the last added bead.
Add two gray beads on the right (red) string and one gray bead on the left (black) string. Tie off.
Repeat this in opposite direction for the right ear.
- Add on a hook or jump rings to hang as a charm, pendant or even earrings.
|
|
 |
|
See other beaded 3-D dog tutorials:
|
|
|
Beaded 3-D Poodle
|
|
|
Beaded 3-D Chihuahua
|
|
|
Beaded 3-D Dog
|
|


