Beaded Cupcake
Back to page 1 of the beaded 3D Crystal Cupcake project!
Back to page 2 of the beaded 3D Crystal Cupcake project!
Back to page 3 of the beaded 3D Crystal Cupcake project!
Back to page 4 of the beaded 3D Crystal Cupcake project!
Back to page 5 of the beaded 3D Crystal Cupcake project!
Back to page 6 of the beaded 3D Crystal Cupcake project!
Back to page 7 of the beaded 3D Crystal Cupcake project!
|
 |
|
| Step 74: |
Before you continue, you should be
starting from something like this:
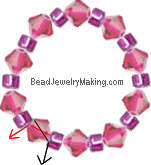
Do not cut away the excess threads as you will continue the beading in the next step.
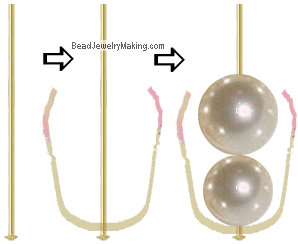
This step teaches you how to make the insert with bigger beads to help the cupcake stays in shape.Take one long head pin, poke it through the bottom of the cupcake, add one 7mm then one 8mm insert beads.
(Tip, if the beads keep falling out of the eye pin, you can bent it slightly or use a crimp bead to stop it from falling out)
|
|
 |
| Step 75: |
Continue to:
-
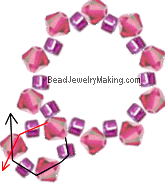
On the bottom (black) string, add one purple bead, one purple crystal, one purple bead and one last purple crystal.
On the top (red) string, add one purple bead and crisscross this string through the last crystal added on the black string.
|
|
 |
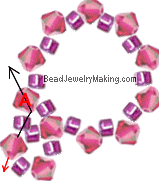
| Step 76: |
Continue to: (working only on one string at this step)
- Add one purple bead on the top (black) string and continue to pass the same string through one old crystal marked A.
|
|
 |
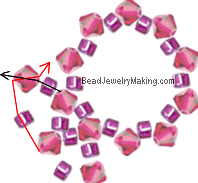
| Step 77: |
Continue to:
- Add one purple bead on each side of the string (total of 2 - one on each string) add one last purple crystal to crisscross both strings through.
- From here on just keep repeating step 76 then 77 all around the top circle of the cupcake seven more times, remember to refer to the next step after the 7th time of repeating for the joining of the beaded ring instruction.
|
|
 |
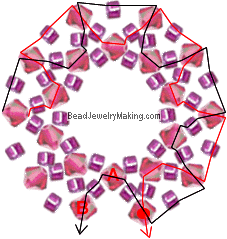
| Step 78: |
- After repeating step 76 and 77 seven more times, your threads should stop at the bottom crystal with the red dot.
- Continue to:
Add one purple bead on the top (black) string, pass the same string back up through an old crystal marked
A.
Add one more purple bead on the same string and pass the string down through one old crystal marked
B.
|
|
 |
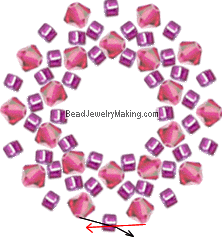
| Step 79: |
Continue to:
- Add one purple bead to crisscross both string through.
|
|
 |
| Step 80: |
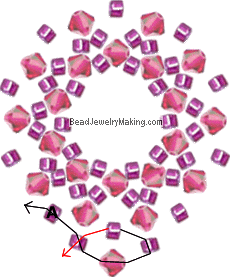
Continue to:
-
On the right (black) string, add one purple bead, one purple crystal and one last purple bead.
Crisscross the left (red) string through the last bead added on the other string.
Continue to pass the black string (the one you used to add new beads on this step) through one old bead marked A.
|
|
 |
| Step 81: |
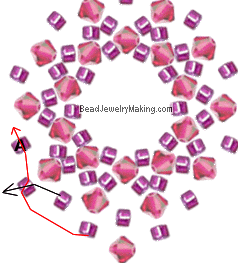
Continue to:
-
Add one purple bead on the bottom right (red) string and crisscross the other string through this new bead.
Continue to pass the red string (the one you used to add new beads on this step) through one old bead marked A.
|
|
 |
| Step 82: |
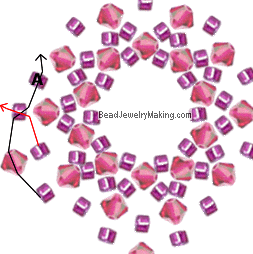
Continue to:
-
On the bottom (black) string, add one purple crystal and one last purple bead.
Crisscross the top (red) string through the last bead added on the other string.
Continue to pass the black string (the one you used to add new beads on this step) through one old bead marked A.
|
|
 |
| Step 83: |
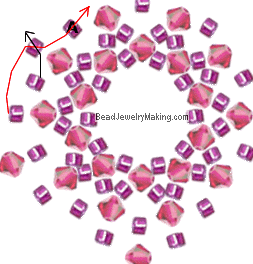
Continue to:
-
Add one purple bead on the bottom (red) string and crisscross the other string through this new bead.
Continue to pass the red string (the one you used to add new beads on this step) through one old bead marked A.
|
|
 |
|
Continue the tutorial on page 9 of the beaded 3D Crystal Cupcake project!
|


